Tuesday, 10 December 2013

VFX: More Testing

I carried out more test shots of my idea because I wanted to see how my storyboard would translate onto the screen and work out what lighting would and wouldn't work. I am going to outline the many problems that came up on these test shots which has helped me understand what I need to do next and also to understand how my filming is going to go when I do the final shoot.
I took some stills of one of the scenes from my storyboard as you can see below.
The type of lighting I wanted was contrast lighting with a reddish/orange tint to it to give that nighttime at home look, plus it would enhance the shadows more. After viewing the test scenes shot, I realised that the orange/red colour did not help express the theme I want and hopefully when I do my final shoot in the evening the lighting will be better.
We tried out two lighting set ups, one was the scene being lit from the corridor and the other from behind the camera so the light poured over a wider area.
With only one crew member and a dolly track being used, my final filming time won't take longer than 3 hours including set up and take down which works out well.

The first image below is the light being lit from behind the camera, I think I decided at the end of the day that this worked better as long as you couldn't see the camera's shadow. I did figure a way to stop that, I had the light stand at a high height which also increased the surface area the light hit. The only problem was that it did not light the bathroom light which I really wanted to be the brightest in the scene.
Image no. 2 was very dark and I may not use that and in image no. 3 you can see the light edges as the I had the scene lit from the corridor and the width of the corridor was small so the light stand couldn't be placed in a position that stopped it from happening.
I had the aperture value at f= 8.0 because this allowed just enough light to be received without it being overly bright. At a f=11, the scene was too dark and not enough was being received, also throughout the day having the value at 8.0 worked with most scenes.
1
2
3

In image no. 4, I was testing to see if placing the doppelganger in that position would work because in image no. 5, my character was going to be standing towards the side of the doorway so neither can be obstructing each other in any way. Image no 5 through to 8, you can see the different positions I tried to place the character in because I wanted starting with an over shoulder shot looking at the doppelganger where it is positioned in image no. 4. Depending on where I stood in the doorway it created a different outcome, I found that filming this scene at a high camera angle would be work best and still give me the over shoulder shot I wanted.

In terms of lighting, I feel it works well because the bathroom light stands out the most and this scene happens after the character is preparing to go to sleep by turning off all the lights in the flat and comes back to find out that the bathroom light has turned it self on. Image no. 8 works best. There is no extra lighting in these images so for this scene I won't need any light and the bathroom window won't be shining as bright because I hope to shoot this sometime after 3pm because it gets dark early.

4

5
6
7

8
Works well the most

Tuesday, 3 December 2013

Long Exposure

http://www.denisolivier.com/artwork/gallery/detail/Ghost_opera/24


This an example of the effect of ghost photography, the work is title Ghost Opera by Denis Olivier.
The images were shot at long exposure and in these images, the subjects seem to be moving so the result is effective.
I like the last one on the right, it looks like the same subject , but I do not know, however it fits well with my doppelgänger idea.

I want to experiment with using long exposure combined with the contrast lighting I'm using and the make up to see what effect it creates. In the past I posted about my experimentation with food colouring to create a misty effect which I then thought to combine with green screen footage to create a ghost effect, but I shall try it with long exposure photography to see which give the best results. This will be done when I carry out my lighting tests this week.

Moodboard

Comex

''The Chivatour Frazee and the Frazee Bell Gardens Sport Center stadium opening was a huge success!
A few months ago Comex Group celebrated a sports partnership with Club Deportivo Chivas USA, an event that has since allowed us to take our color and passion for soccer further beyond our own borders.
Due to this partnership exercised through our Frazee Paint brand name, a leader in California, Arizona and Nevada and operating more than 110 service centers throughout the region, we have made soccer fans in the United States quiver by organizing family gatherings during their favorite team’s matches.
The Chivatour Frazee has brought soccer lovers close to their idols, including autograph sessions with soccer icons such as Claudio Suarez’s, who was side by side with customers for two straight hours.
Furthermore, in order to encourage family interaction, we have set up special areas like the ones where Chivas USA played against Colorado, FC Dallas, DC United and New York, where fans can play table soccer, draw banners to support their team, kick penalty goals, among other activities.
According to local and regional media, the June 10th Frazee Bell Gardens Sport Center opening was a huge success. During the event, visitors interacted with the beautiful Chivas Girls, taking photos and participating in fun activities.
This is how Comex Group continues supporting Chivas USA, one of the best teams worldwide, contributing at the same time to their MLS leadership and closeness to their growing number of fans.''


I came across the article above while trying to research into how the paint company, Comex works. Since my idea needs to include the important of community through soccer, finding this article from their website is going to help. Comex, supports the soccer team Chivas USA, the paint manufacturer company has its logo on the team jersey's shirts, this is to bring more exposure to their company and show that they support the team and sport to the fullest. (http://www.cdchivasusa.com/) 


Below I have posted a video that I found on youtube, there are many others showing how the team are close to their community and provide community gatherings. They even train in front of the fans to show their love and that they appreciate the support from them.


TMB: Panyee FC


http://www.shortoftheweek.com/2011/12/31/tmb-panyee-fc/

I watched this film about the origin of the 'Panyee FC' soccer team in Thailand. I found interesting from the beginning to the end so the narrative quality of the video is very good. I shall definitely study what qualities/techniques were used to convey the story to the audience so well, because even though I do not play the soccer sport, I felt I understood the game more.

The theme of the film is definitely about perseverance because the odds are against the boys in the beginning but they had courage and hope and made the villagers believe in their dream as the story goes on.
This will help me with my brief from the MO Film website because I want to able to get the importance of soccer to family and friends who know a player or are related to them.

The production quality is high, scenery is beautiful and key to the story because it visually enhances it too instead of having a city in the background while trying to describe an island surrounded by water, so location is key to my idea if not my story won't be believable.
By the end of the film you would not guess that it is an advert for a bank. The slogan of the bank being 'Make THE difference', so this film is really good research for my brief as that is for a paint company client.


Thursday, 28 November 2013

VFX: Location of film

This is the location of my video. It is going to be shot in a flat because I think a contained space will help the horror theme as contained spaces show that the character is feeling trapped.

The filming will be shot mainly during the evening time because that's the time of day for that the story is set in.
The equipment I know I shall be needing:


  • Dolly Track
  • Tripod
  • Camera
  • 2 lights (to create some nice contrast lit scenes)
  • Microphone


I am going to have some help when I do the filming so I know that set up time won't take long and I am going to be soon carrying out lighting tests for my video so I will know approximately how long shooting might take when I do the final filming.
I have tested the visual part of my idea to see if it was possible and whether or not I liked it, so now my next step is to work on how I want the lighting and sound to be in the video. These will be small tests but will help to answer and solve many questions I have, such as how I can avoid the subject and the doppelganger's shadow interfering with one another.

Censorship and 'Truth'

Brief Notes:


Wednesday, 27 November 2013

Shadow Problem with Doppelganger


Doppelganger Experiment 1 from Munirat Plummer on Vimeo.


From these test shots and in the screenshot you see below, I have thought about a problem which might affect the visual outcome of my video. I think that the shadow cast by the doppelgänger needs to be subtle so that it is easy to see that it is a paranormal aura.

I might have to consider using green screen to film the doppelgänger's scenes because this will allow more freedom when I want to edit and add any effects on it.

My next test shot will be more precise because I am now going to consider lighting in the scene so that the horror/thriller theme will be obvious. I am going to do this test because it will allow me to see the shadow of the subject since its going to be more obvious and harsh due to the contrast lighting I am going to have.
In the test shot I shall be testing the scenes from my storyboard and I can see if it will work or any changes that need to be made.

The previous test shots I made has allowed me to notice this new problem which could have easily been overlooked.

Tuesday, 26 November 2013

Work Experience on the 'Residue' Film set


I had a work experience day on the film set of 'Residue' that will be releasing the near future.
I started the day by reporting to the 2nd assistant director's office where he handed me the scripts and call sheet of the next few days of filming.
I was taken to the film set with other students doing work experience, there were 3 of us. We arrived at the film location, set in a restaurant.
The first main jobs I was given was running errands, getting and making refreshments, cleaning the set and helping clear out any equipment that wasn't being used anymore. The first half of filming in the day carried on until lunchtime around 3pm.

I really enjoyed being on set and watching everyone carry out their roles on set, working together so well. The equipment was really high quality, I imagine to get the best results for the film. I got to watch the scenes on the director's screen as they were being shot and it was really good to see that some scenes required more takes while others did not take long to shoot. I found that what took the most time was setting up the equipment especially in a contained space like the restaurant. There are loads of safety regulations that were considered so a lot of background work went into the each scene before it even got to the filming stage.

The crew on the film set was made up of about 40-50 people, this consisted of roles such as drivers, sound crew, make up artists, actors/actresses, directors, assistant directors and lighting crew.
When we moved onto a different scene and filming location after lunch had been provided, which I enjoyed, the crew went on to the next filming location and we were given radios to be able to communicate with each other. I felt like part of the crew with these radios, the assistant directors could ask about my whereabouts or give orders and I didn't have to be close to them, this really helped because we were shooting outside now.
My job during this time was to help setup any refreshment stations and keep pedestrians from disturbing the scene while filming was on, which was a cool task to do.

The 3rd assistant director gave us a short introduction to how the radios worked and how we responded. I learnt that the phrase 'lock in' meant get into the position or role you were assigned and basically mean get ready because filming might start soon.
Another phrase was 'turning' which meant that the camera was rolling.

I found that doing this work experience taught me so much that can't be taught in uni and meeting the different people was really exciting and I enjoyed it so much it is beyond explanation and will definitely continue to look for more work experience and runner jobs to build up my experience.

I learnt about three companies from this day: Matador Pictures, Green Screen Productions and Future Effects (Special Effects for TV & Film).

Friday, 15 November 2013

Movie: 42

http://www.imdb.com/media/rm1342611456/tt0453562?ref_=tt_ov_i


Brian Helgeland directed this film and wrote it. Watching this film, is so inspiring that by the end you are rooting for the main character, Jackie Robinson. His struggles with coping during the times when racism was close in his face and being the first black man to join a baseball league team and play with them are inspiring. This movie is definitely an inspirational film, even if the audience does not know anything about baseball, by the end of the film you love the sport without even knowing the rules about it. 

The scenes were shot in a simple way, with tracking shots which I think helped to give the film its steady pace, which I believed helped with the storytelling. The story was told beautifully without being rushed, though the film is long and lasts about 2 hours, it keeps you glued to your seat and slowly build the climax to the end where Jackie Robinson takes the Dodgers team to the World Series.

I noticed that the movie soundtracks really complimented the scenes, the music helped to create drama which I thought was clever, not many movies have good soundtracks. The film was released this year in April. I didn't know it was out but just stumbled upon it and I am glad I did because it ticks all the boxes in how a biographical movie should be told visually.
The movie is set during the 90's, from the environment to the costumes, every aspect has been definitely been thought and I also felt like I learnt more history watching this film than reading a history book. The dialogue in the scenes were kept short and straight to the point which I think helped the storyline get across without having long dialogues to make the audience look track of what is going on.

Since learning how to use more equipment during our VFX studio time, I definitely see how using equipment such as dolly tracks or cranes can improve the production quality of a film.

Thursday, 14 November 2013

Motion Capture: Capturing Interaction between Human and Animal

http://www.nationalmediamuseum.org.uk/BradfordAnimationFestival/BAFGame

http://www.nationalmediamuseum.org.uk/Events/BAF/2013/M/MotionCaptureCapturingInteractionBetweenHumanAndAnimal.aspx
This talk, carried out by Karl Abson, a lecturer at Bradford University, was very interesting to me, even though I would have wanted to see more results of the motion capture with more animals, but the lecturer did state that the reason they focused their experiment with a horse was because it was easier to teach and control.
The talk was mainly about how introducing Motion Capture using animals could help prevent risk, removing danger, can create quicker and cheaper results. It will eliminate the need for animators who have to animate an animal's movements quicker without them needing to look into the anatomical study of the animal's body use the information taken from the motion capture to inform them.
He said, animator's might be worried about their job being taken away but do not look at it that way, it is used more to reduce the time spent on researching everything about the animal which you might as well be a vet, he stated.
To carry out the experiment on the horse, his team needed to hire a studio, equipment, vets to make sure the animal was in good condition and care, VFX artists and animators. The technology used to read the information from the cameras was Blade (http://www.vicon.com/Software/Blade). This software is meant to give you quick feedback of your readings, it saves time and allows the user to still have full control giving room for experimentation.

The negative points of using motion capture on animals is that it is harder to control them obviously due to the communication factor, and depending on the size and type of animal, the markers emit light received by cameras need to be placed correctly on the animal so it can be read properly. The problem of what material to use to attach the markers to the animal is also hard because you do not want to hurt the animal which is why Karl Abson had vets on hand to keep the horse in check.
However, a time when the use of motion capture on animals would have been a good use was during the filming of Life of Pi, at no time was the tiger on set as that would have created many problems, so animators had to animate and create a 3D tiger, but studying the way it moved and its actions would have taken them a very long time.

I decided to talk about this lecture since my interests do lie in Visual Effects and Film, this research study could be more used in the future since there are University and studios experimenting on different types of animals.


Reflection on Bradford Game Festival

http://www.nationalmediamuseum.org.uk/BradfordAnimationFestival/BAFGame
On Tuesday and Wednesday, this week, our class visited the Bradford Animation/Game Festival which had a series of talks and discussions that were held.
Last year, I mainly visited the Animation part of the festival and this year only the Game part. Next year, I hope to attend both the Animation and Game talks depending on who they have on their line up.

I am going to be talking about the talks that I found interesting and what I took from the festival.
There were talks from Brian Horton (Crystal Dynamics), Steve Lycett (Sumo Digital), Warren Spector, Futurelab and Viktor Antonov.

WARREN SPECTOR


http://www.nationalmediamuseum.org.uk/Events/BAF/2013/W/WarrenSpector.aspx
In this talk, Warren talked about his childhood memories of Disney and how it has continued to influence his work till now. I enjoyed this talk because he explained the different stages that had to happen to make the game Epic Mickey.

Warren Spector has been in the industry for more than 30 years and worked in several companies, he stated. The concept he based the Epic Mickey game was to make Mickey be seen as a hero while still keeping the iconic character's characteristics intact. The concept was what helped drive their idea and the various team members that worked on this project also helped to bring it to life. Warren Inspector wanted to add that quality of cinematic storytelling to the game. He also wanted pay homage to certain artists that created previous cartoons that he enjoyed during his childhood. I learnt from him to learn to take inspiration from all sources that you can but still maintain the creative box that you were given to work with.
http://conceptartworld.com/?p=14678

http://conceptartworld.com/?p=17418
The images are some concept art done by various artists posted on Concept Art World.


KEVIN CARTHEW FROM TEAM 17

Kevin Carthew, Creative Manager from Team 17 had a part in creating many iconic video-games in the past 25 years. I enjoyed his talk because he made the topic of his presentation based on How Animation improves Interaction?. I thought that the points he made could be transferred to filmmaking, because even though an audience is not playing your game, you still want to create interaction with them through sound and visual imagery anyway that creates that connection with your audience, so although it was mainly based on games, I think that I can think about them when I produce future work.
He stated that they are an independent company and the game Worms has been their official breadwinner and biggest game. I thought that it was great that they built on that by creating more Worms games while still creating new games like Superfrog and Alien Breed.

The few points I wrote down that he made about how animation improves interaction were:

  • MAKE IT SNAPPY: input driven, not animation driven and create levels of interactivity according to the game
  • MAKE IT REWARDING: visual feedback is part of the game reward. Quality visual feedback can be used to modify player behaviour.
  • MAKE IT PLAYFUL: keep animation fresh, multiple animations for frequent events, for example when a character dies in different environments/situations, try to change the animation so it does not get repetitive.

BRIAN HORTON FROM CRYSTAL DYNAMICS

http://www.nationalmediamuseum.org.uk/Events/BAF/2013/B/BrianHortonCrystalDynamics.aspx
http://www.tombraider.com/gb/base/home?refer=71

http://www.tombraider.com/gb/base/home?refer=71

Brian Horton was worked in the games industry for 15 years as a fine artist and illustrator. He has done many works such as Buffy the Vampire Slayer and Star Wars, he is now the Art Director for company Crystal Dynamics.
He was given the project of creating the new Lara Croft: Tomb Raider game with a sequel announced 
during the talk yesterday. He stated that being given the responsibility of bringing the icon Lara Croft 
back was great because he enjoyed playing the previous games, however this time he wanted to move
the image of Lara Croft from a sex symbol back to the a strong woman seen as a survivor.
His team and him thought of the themes that most films and games are based on such as horror, love,
betrayal, vengeance and survival, to name a few. They chose to base it on survival because this meant 
that they could re-design the image of Lara Croft in much more stronger image and create a journey that
would make the players feel connected to.
I found this very interesting because he explained about ways of tackling a problem and the way he drew
from many various sources to understand how they wanted the character to move in the environment they
placed her in. They used various actresses and models as sources for the face, body and style of the Lara
Croft. They tried to keep her image still recognisable through the model. 
The Xsens technology allowed them to motion capture certain complex movements that were needed in 
the game, while the rest were accurately keyframed. I found the fact that you couldn't tell the difference 
between when the motion capture and keyframing were used, this meant that the animators were 
highly skilled in their field which Brian also stated.


Ethics: What is Good?

Today, our lecture was about Ethics and how we as designers can influence this capitalist world and still be ethically ''good''. I am going to briefly talk about certain points from my notes made in the lecture.

Living in a capitalist system, how can we survive in this system in all aspects of career and life?

The article by Ken Garland in 1964, ''First Things First'',  a manifesto produced during an affluent time talks about how designers felt frustrated with producing pointless ads for products like cat food, detergent etc.

The ad was then re-written by the magazine Adbusters in 2000, outlining similar problems but mainly placing the blame on advertisers and accusing them of not using their talents to stop the capitalist system.
The article basically talks about how capitalism is the main cause and not the designers but designers also need to stop encouraging that and use our problem solving skills to help charities and help the planet. However, there were 22 visual communicators that were in favour of upcoming advertisers to re-think what jobs they took, this is easier said than done because most of the 22 visual communicators already had made a name for themselves and didn't need to look for work and could easily sustain themselves, whereas this is not the case for upcoming designers.

Victor Papanel, a writer stated in one of his articles, that most ads are designed not for the needs of the people but for the needs of manufacturers to sell to people.

Radio created using any material that can burn such as cow dung and a juice can. Manufacturing costs came at 9cents.
http://www.flickr.com/photos/laimagendelmundo/3832399766/


Victor wanted to make people understand that designers since we are what connect the manufacturer's to the public, should create work that improves our world instead of just thinking for profits.

The tips left to us after the lecture was How do we determine what is Good?

Subjective Relativism
there are no universal moral norms of right and wrong
all persons decide wrong and right for themselves

Cultural Relativism
ethical theory that what's right or wrong depends on place and time

Divine Command Theory
good actions are aligned with the will of God
bad actions are contrary to the will of God

These points do not fit every situation and therefore cannot really be used. Immanuel Kant, a german philospher created theories that stated how humans could determine if an act was ethical, it is called Kantianism.

http://cdn8.openculture.com/wp-content/uploads/2013/09/kant-shooting.jpg

He created two moral rules based on two categorical imperatives.

History Of Compositing

Compositing: A technique that is used to combine various shots in any format whether it be 2D or 3D into one scene.

(Un Homme de Tetes) Melies: Both are examples of the first compositing technique used in films. It used the technique of double exposure on mattes which allowed for different shots to be combined into one shot. Melies would black out parts of the frame he shot using a sheet of glass with some black paint because in those days it didn't matter as black and white films were the only format films were produced then. The matte helped to make sure certain areas of the film would not get exposed, he would then rewind the film and expose the part of the frame that was under the matte earlier, thus resulting in double exposure. This technique at the time was surprising and it was a help towards methods that are used today in compositing.


Matte Painting (Glass): This was a good way to create a false visual image. Sets or backgrounds would be painted on a sheet of glass and then placed between the subject and the camera which then eliminated the cost of large sets needing to be built.

Travelling Matte a.k.a Black Screen: This process which is also called the Williams Process was used in the film 'The Invisible Man'. The black matting process photographed subjects against a pure black background, the film was them duplicated to high contrast negatives until a black and white silhouette was created. The black and white silhouette was used as a travelling matte because it could be re-positioned throughout the frame. The negative effect of the black screen was that no shadows could be seen which meant it still didn't create the perfect compositing effect needed.

http://filmmakeriq.com/lessons/hollywoods-history-of-faking-it-the-evolution-of-greenscreen-compositing/


Blue Screen (Dunning Process): This process invented by C. Dodge Dunning used coloured lights to indentify the subject and background. The background was lit blue and the foreground yellow, and then using dyes and filters the blue and yellow light could be split apart to create travelling mattes with shadows.
http://filmmakeriq.com/lessons/hollywoods-history-of-faking-it-the-evolution-of-greenscreen-compositing/

Yellow Screen (Sodium Vapour Process): Vlahos created this process as there was a big demand to create a compositing technique for colour films as black and white films became less produced. This process used the chemical sodium, because it emits light at 589.9 nanometres per second (nm/s) and the camera used allowed 4 strips of film so the actors were shot against a blue background, because it was the farthest colour away from human skin tones. Separating the blue gave three colour negatives, a silhouette matte was created as seen in the Williams Process, then a printer combined the mulitple shots back into one. Disney was the only company to have this camera which meant that they were at the foreground of colour film, they did allow rentals of this camera but it was charged at a very high cost.
http://filmmakeriq.com/lessons/hollywoods-history-of-faking-it-the-evolution-of-greenscreen-compositing/

Colour Difference Matte: Vlahos later then created a new improved process which took him a very long time, but didn't require any bespoke hardware and could be used in any format which made it possible for more filmmakers to use compositing in their work.
http://filmmakeriq.com/lessons/hollywoods-history-of-faking-it-the-evolution-of-greenscreen-compositing/


How Green Screen became more used than Blue Screen?
Green became a more used colour because as seen in the diagram the colour registers more on electronic displays than blue and red. Sometimes, a blue screen is used if it will allow more information in the shot to be used, in reverse a shot with a blue sky would be filmed on a green or red screen because the shot will be clearer.


Mist Experiment


Food Colouring with Water from Munirat Plummer on Vimeo.
I did the experiment above as a response to the Mr X video I posted recently. I was impressed by the use of smoke effects to show how the tattoos were acting on the body. I thought I could experiment with doing this with my idea of a doppelgänger. I haven't yet thought how I want to visually represent it, so these are just simple experiments below that I did in After Effects.


My tutor gave me the idea of creating a human body shape mask so you can't tell if that the mist is food colouring in a glass. I created duplicated the masks and added different layer modes as you can see titled in the image. I shot the footage at 60fps which I then reduced to 10fps so it played back at slow motion.

The descriptions are the layer modes I used in AE to change the colour of the mist and make sure all the layers could be visible.


Human Mask Shapes from Munirat Plummer on Vimeo.

I animated the masks in After Effects, and got them moving and decided to keep the middle mask in its original colour mode and change the others to match the colour of the solid layer which shows that if I changed the colour I could change the way it looks which might help convey the thriller/horror theme I want in my video.

The colour of the background in the image below should be considered because I am not yet experimenting with lighting, but that is my next stage. However, I like how the mist has embodied the shape of the person, maybe next step would be to go from using a glass to a fish bowl or something bigger. Here I see if making the mist embody a human form if it will work. I think it will.
I used the footage from our Green Screen compositing lesson and overlayed the mist on the outline of the subject from the video.


I carried this experiment because I wanted to create that effect of cold air or mist that people say they feel if a paranormal aura was present. Though this experiment may not be used or evolved, I think it will help me rule out whether I want to include it in my final video or not, so far, I am still not sure because I like the effect that it created but I need to place more in the concept that it will be used in.


Friday, 8 November 2013

Green Screen Compositing Tutorial

Today, we learnt how to take footage already shot from a previous shoot and the green screen footage into After Effects to combine them today. I am going to post a few main points raised and then the final result of the compositing. I will probably be researching more into certain processes and might need to apply it to my final video project.

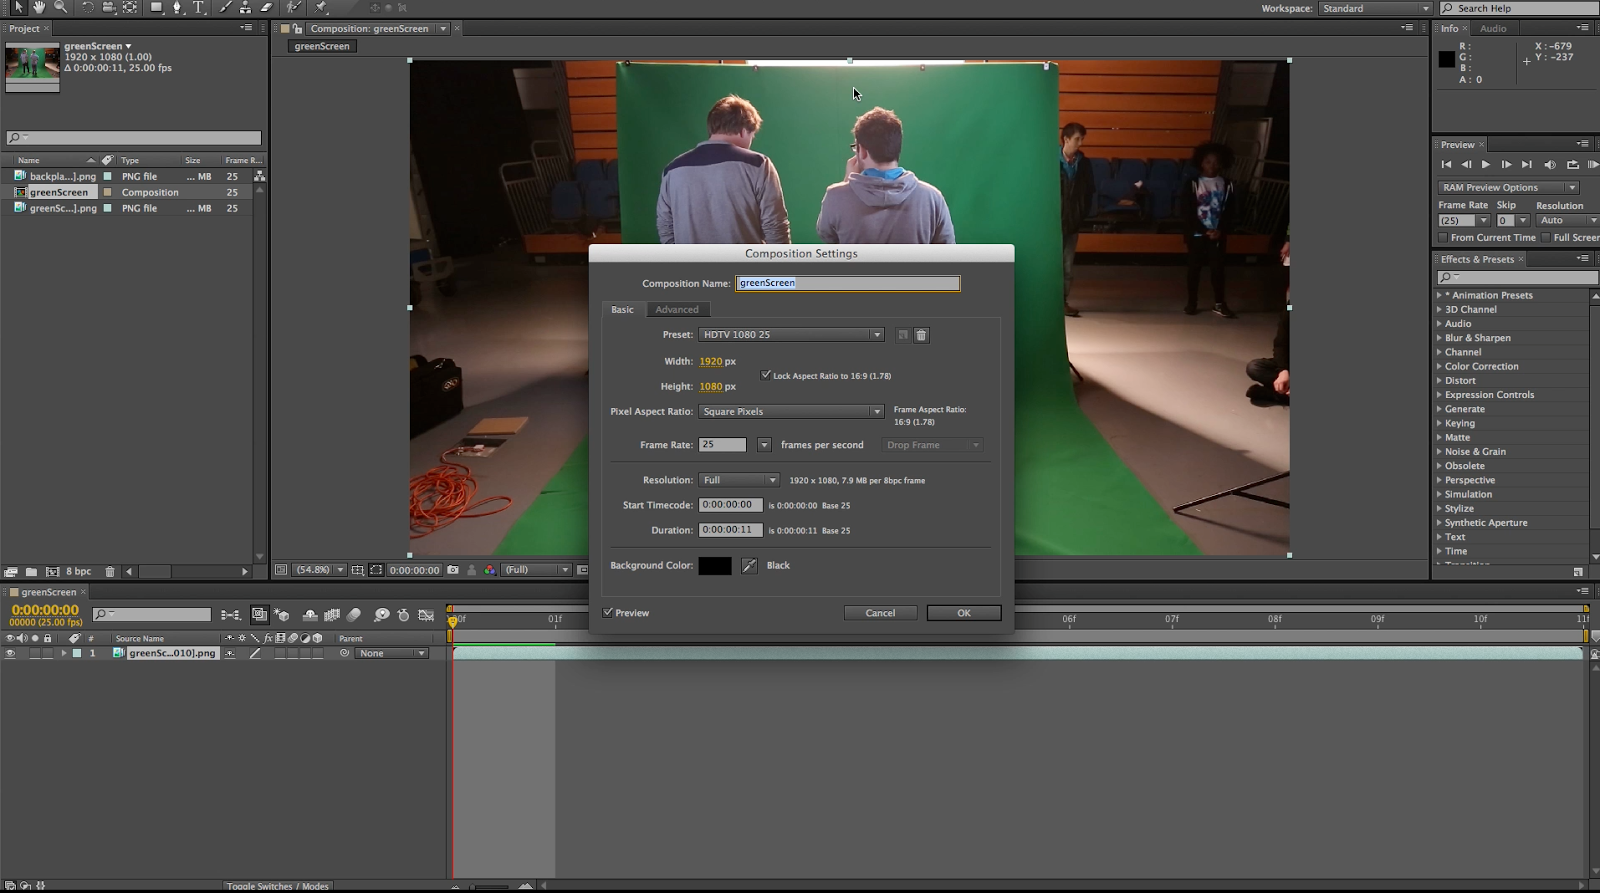
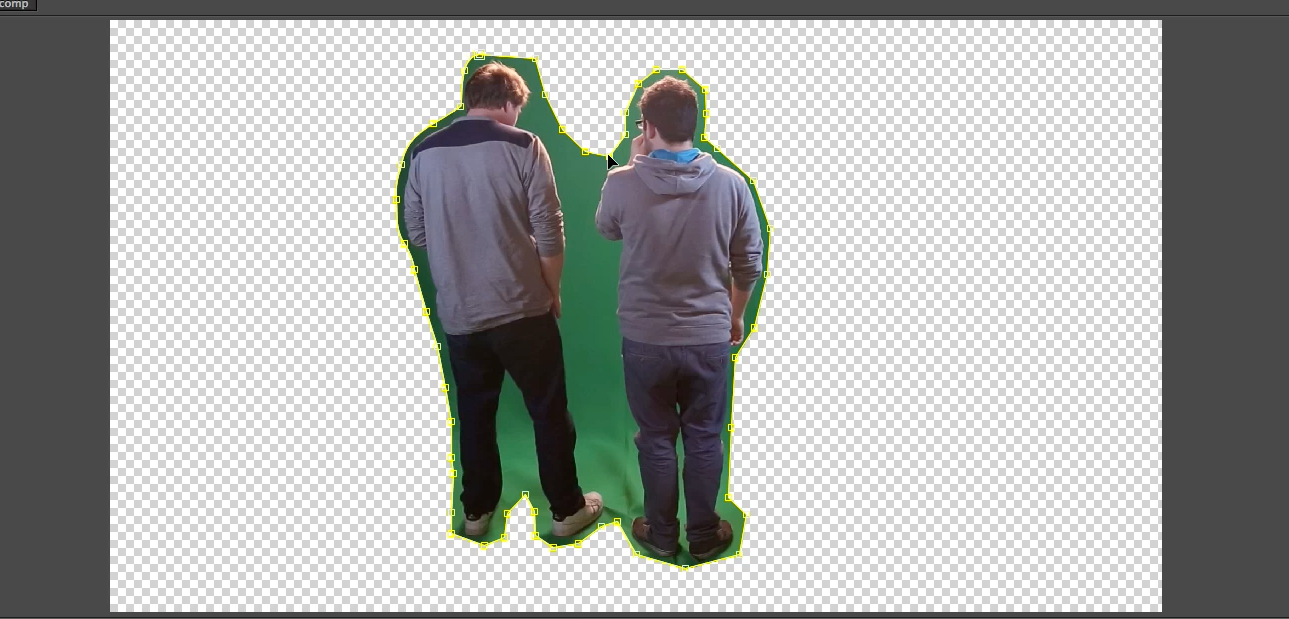
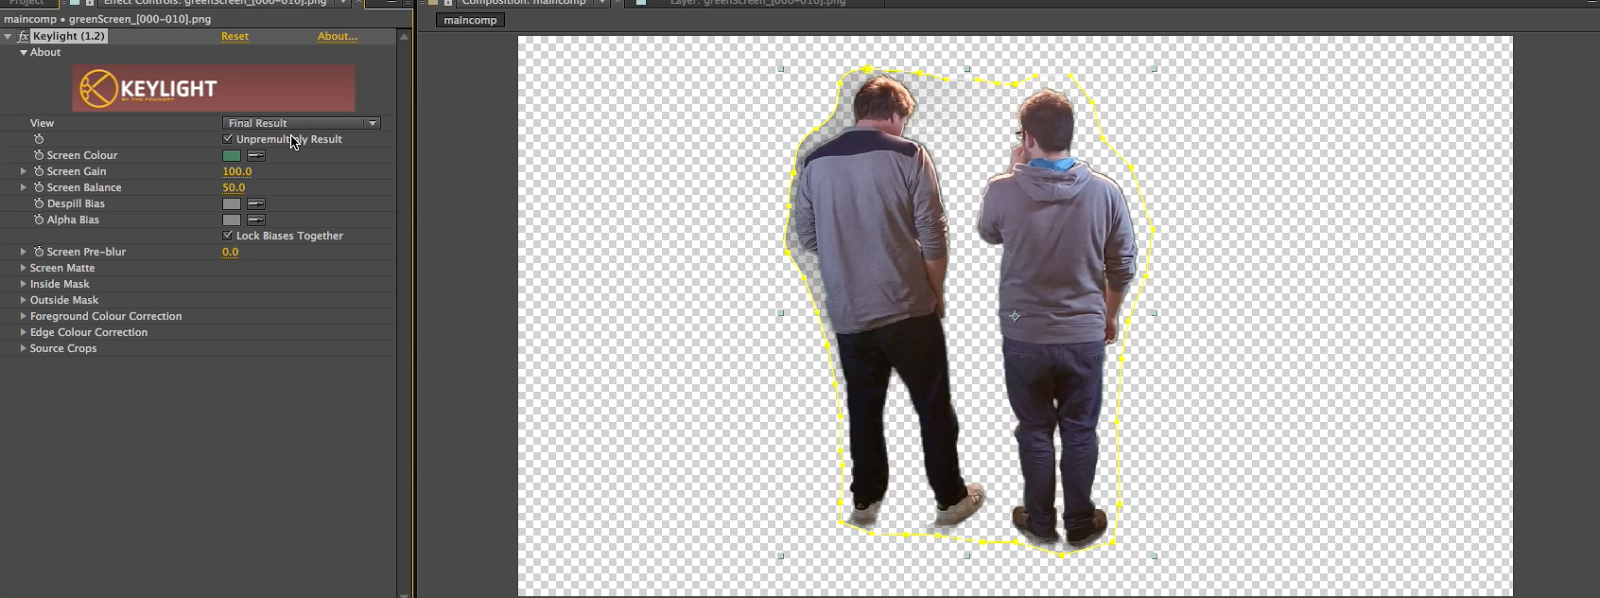
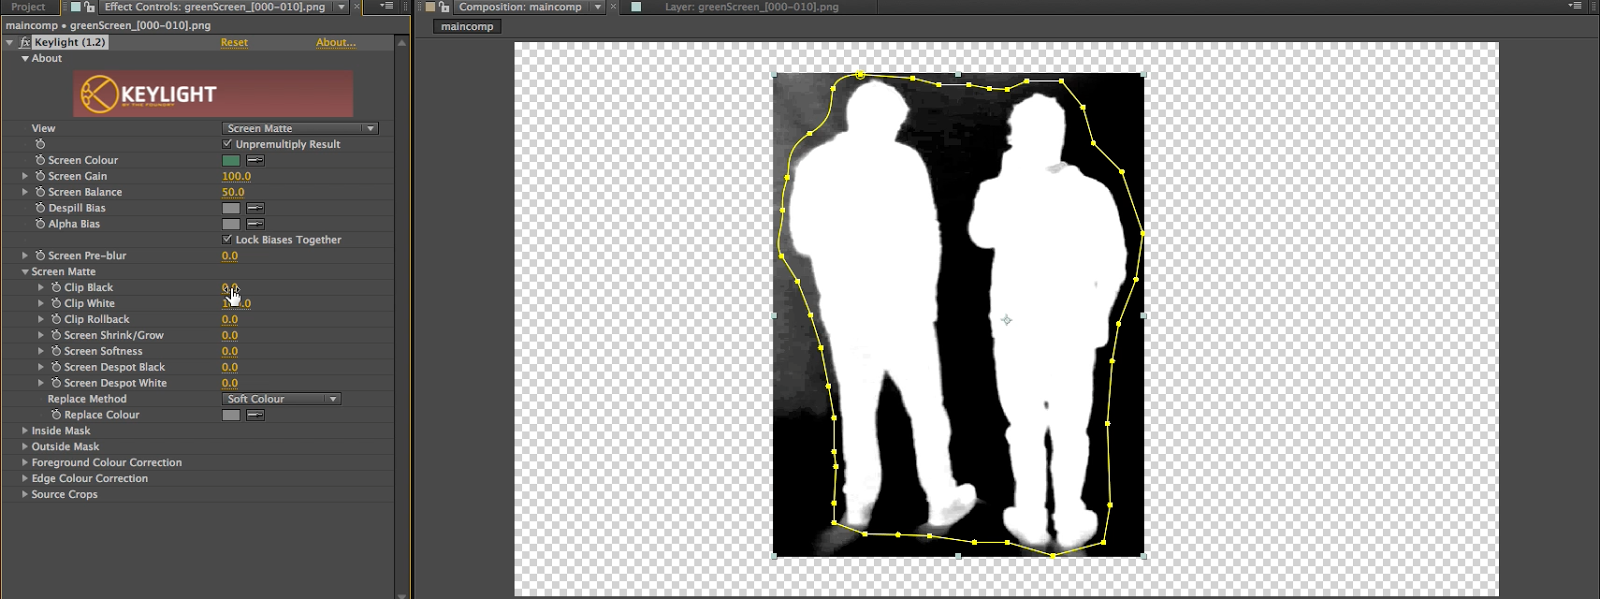
I recorded the actions during the tutorial using Quicktime's 'movie recording', so I can go back and look through the processes in detail. These are the screenshots from the videos.

Make sure the frame rate is the correct value

Mask off the area or subject that you need to composite into the scene.

Using the Screen Colour tool we made the green screen background disappear.

Here we then used the Screen Matte tool to change the clip black and clip white values

Using the Screen Shrink/Glow tool, we could kind of adjust the look of the fact that most of the subjects feet were cut off.

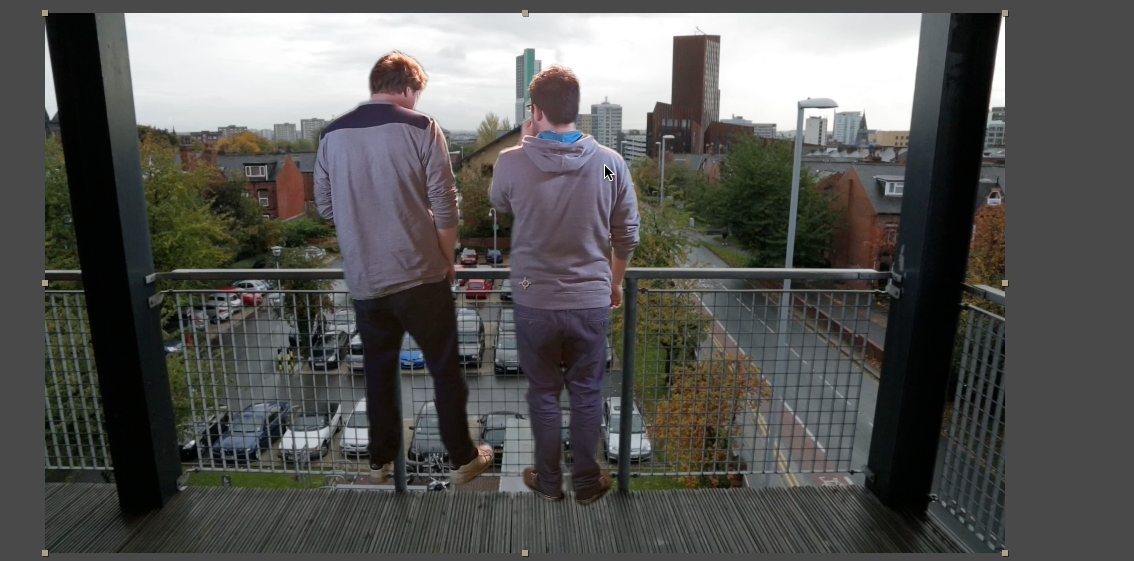
Then placed the final mask cut out into the back plate of the scene we wanted to use.
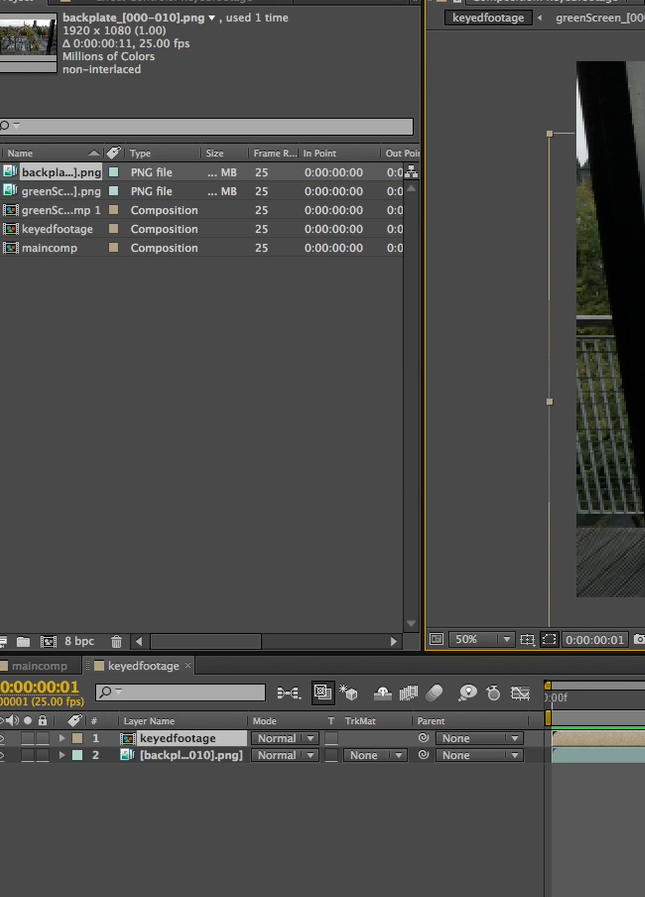
Throughout the tutorial, we used the 'pre-compose' tool to create a new composition that had effects/settings so we could then add that into another new composition or the current one we're working on, therefore if we needed to go back and change anything in a previous composition it will automatically change the settings in the new one. This makes editing the footage easier because different composition with settings that can be changed without affecting the final result.

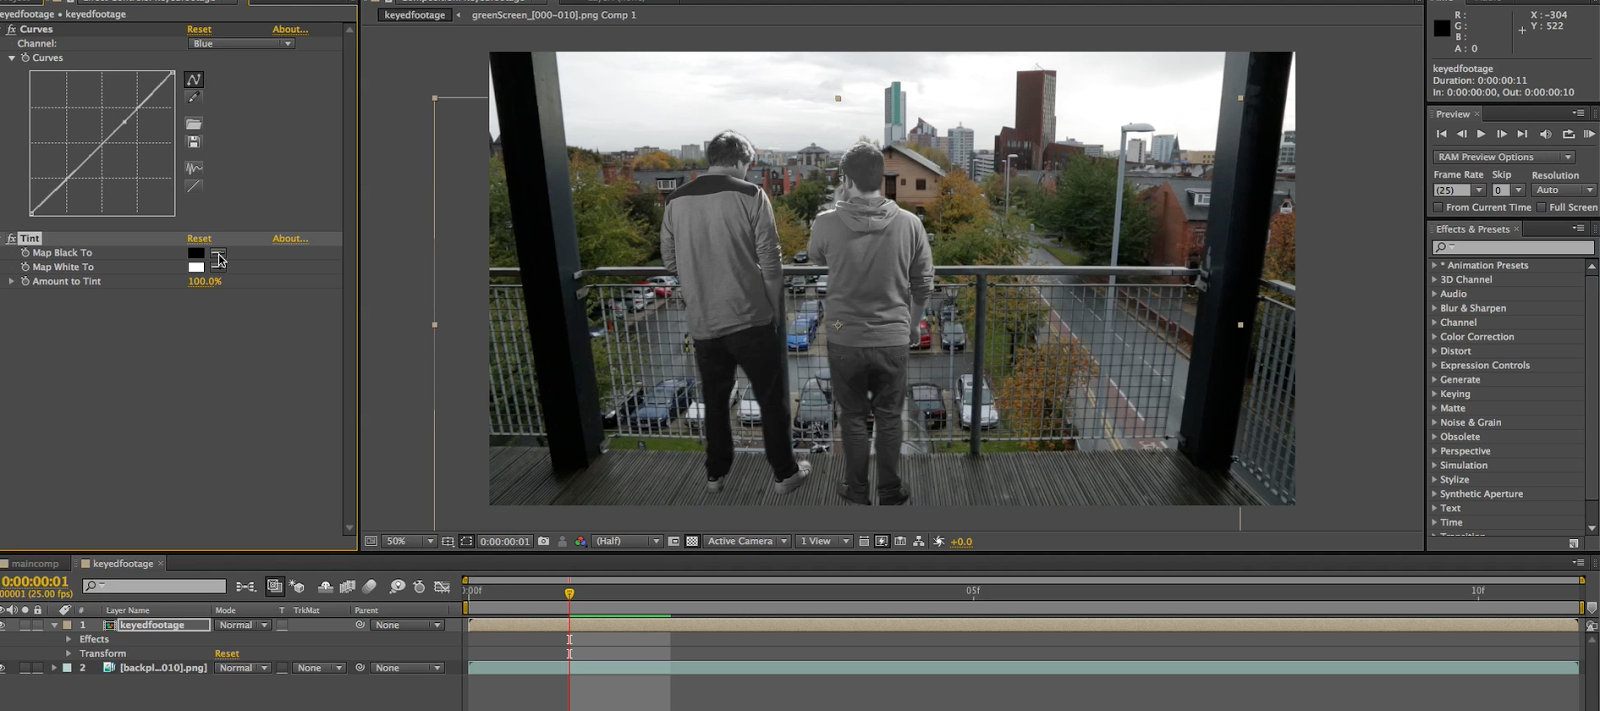
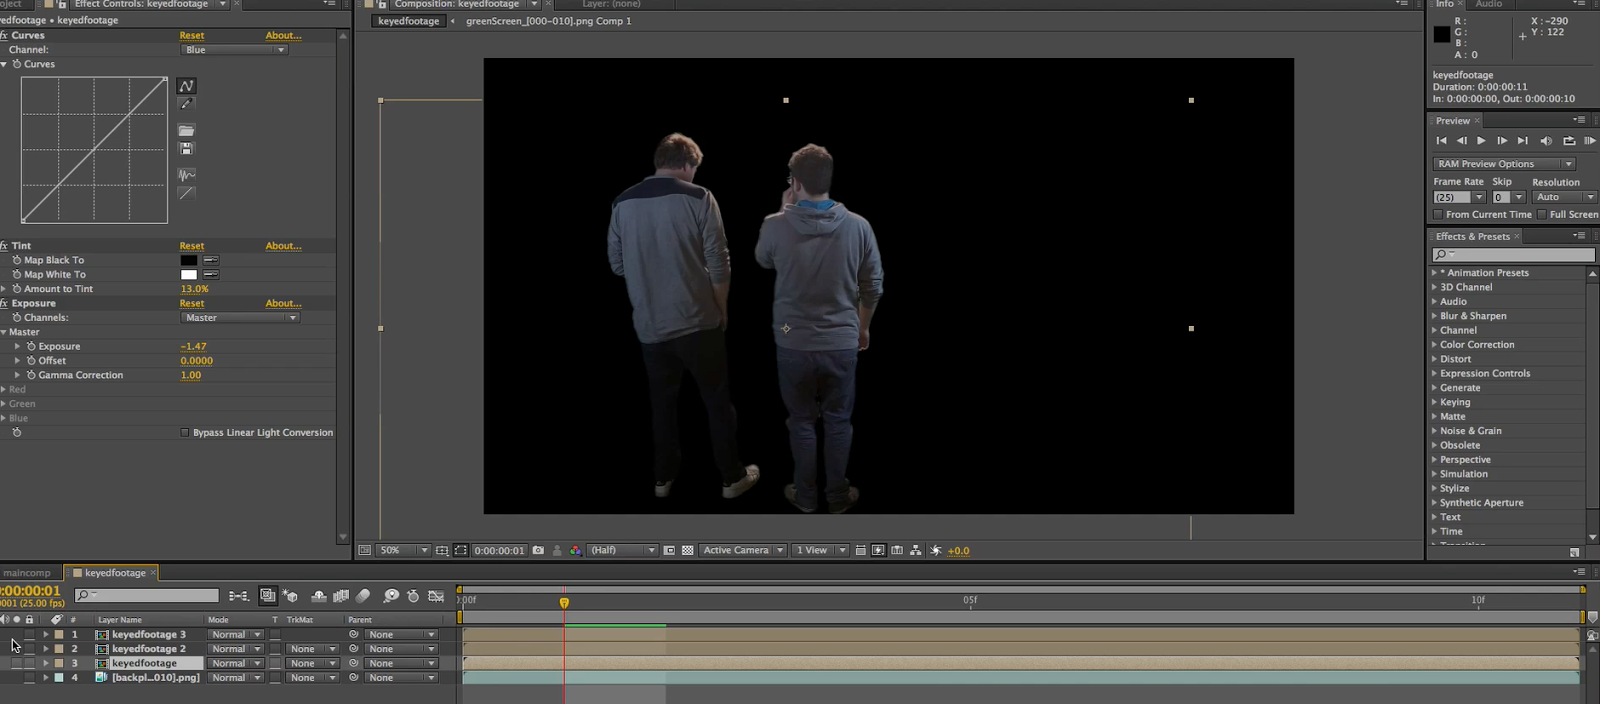
Here we're using the color correction tool to make the lighting try and match the back plate scene

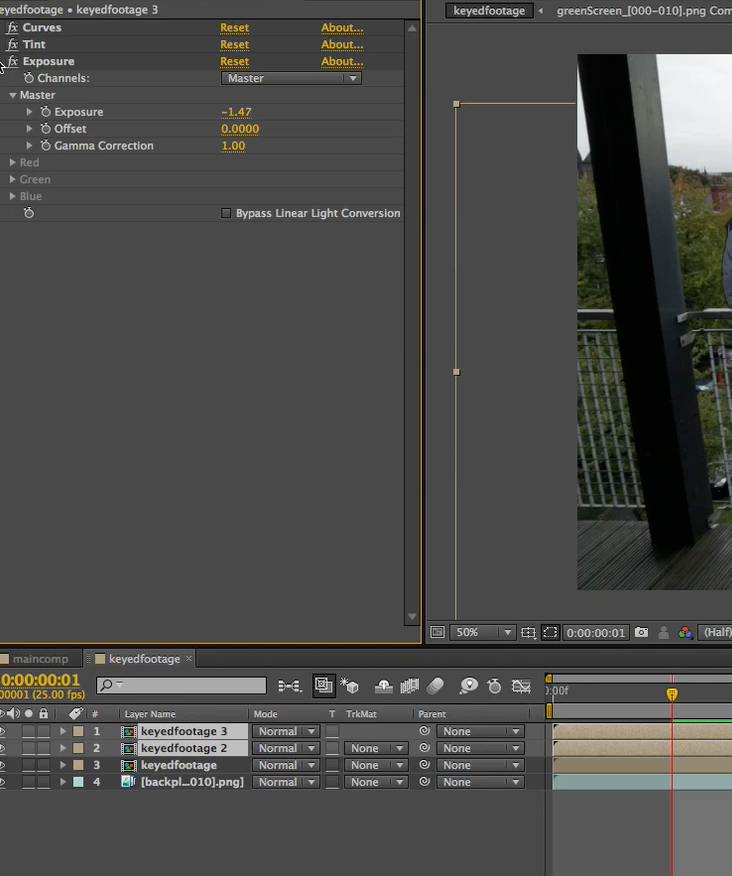
We duplicated the ''keyedfootage'' composition and then deleted the effects in the top compositions so we still had the effects in the main file.

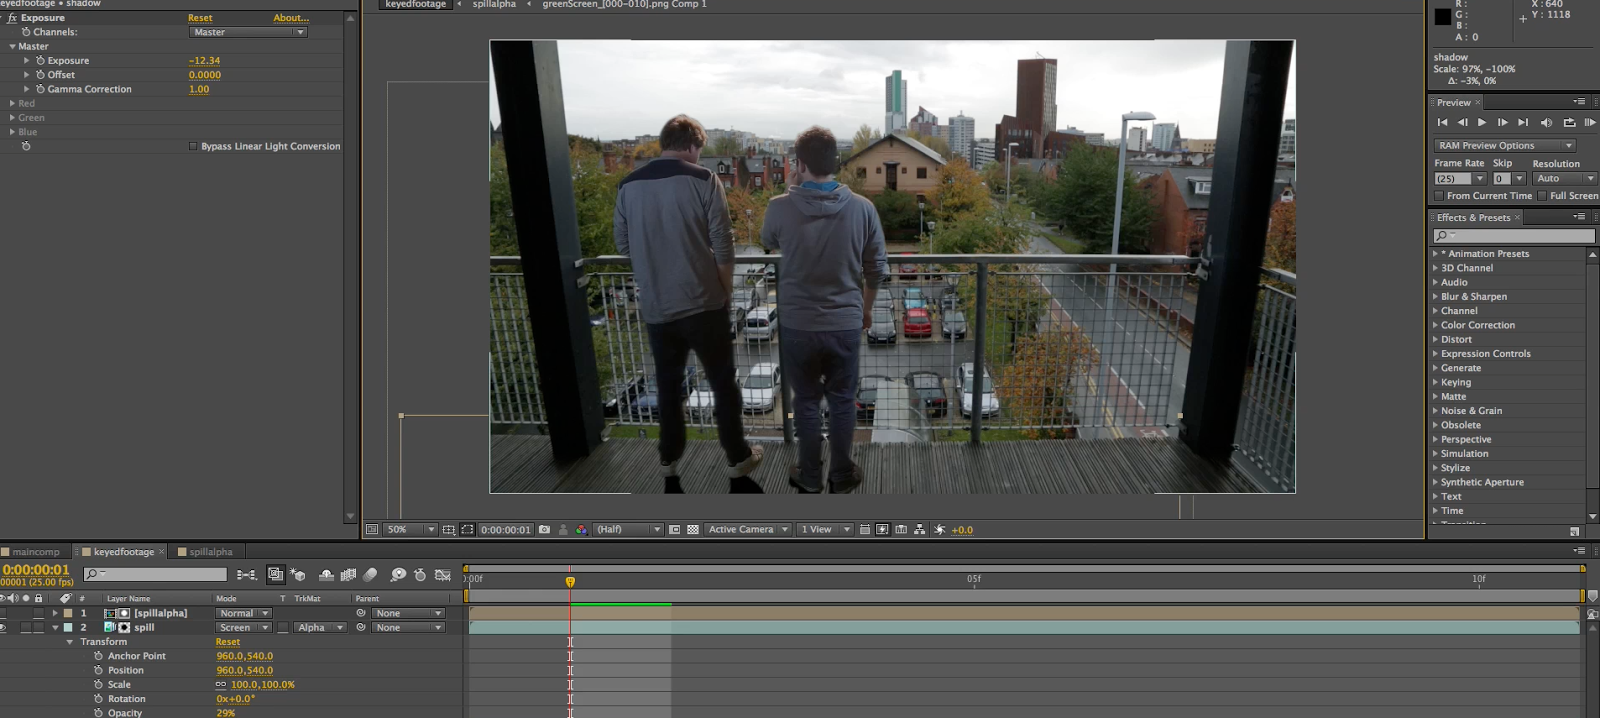
Mainly more colour correction here in this screenshot


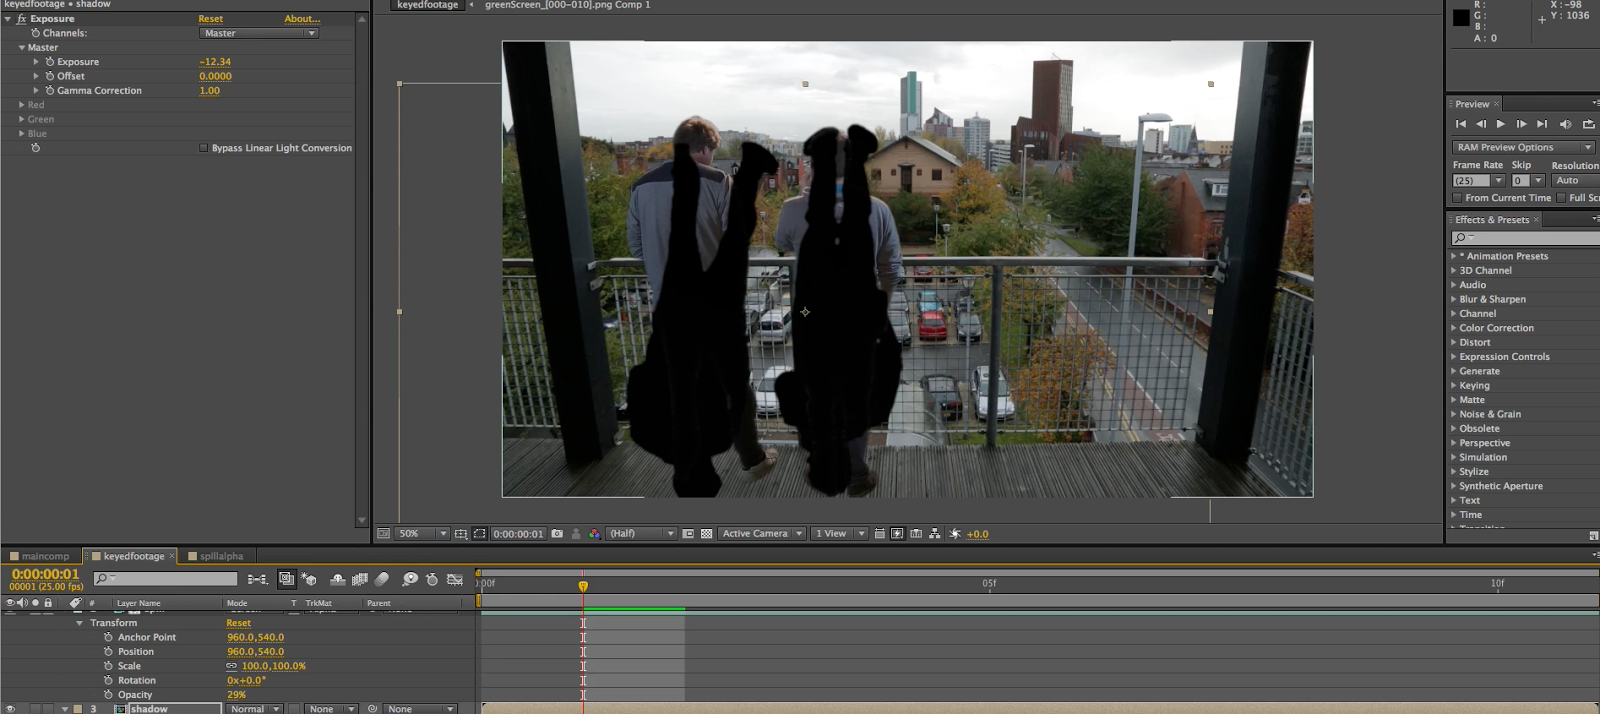
Here we are working on adding a shadow to the scene, this is only one type of technique to adding a shadow, there are many other ways of doing it, hopefully I will research into more and try them out.

The shadow is then re-scaled and positioned and moved to where it should be as you can see, it is positioned at the bottom of their feet.

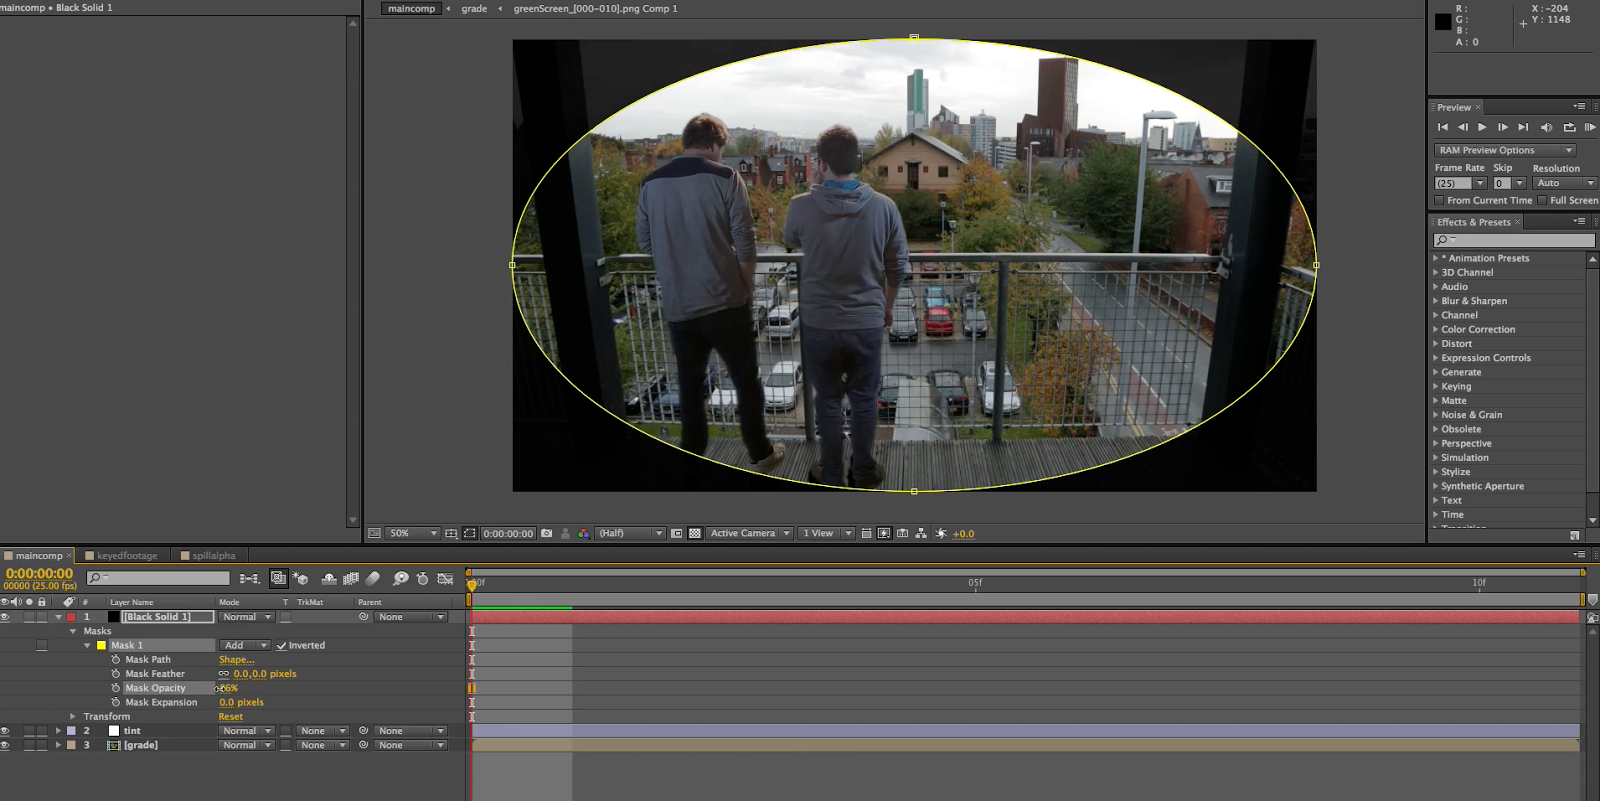
Final touches being added here, like another mask with some extra tint settings to make sure the colour correction or general look is better.


Green Screen Final Result from Munirat Plummer on Vimeo.